Using PHP to change file permissions on the webserver

Symptom:

  • “Permission Denied” When trying to work with your site over FTP.
  • You cannot modify directories inside the /files folder that were created by server program.

Solution:

  • Tell Apache to give you back control of your files.

One side effect of having files created by server program (eg the image module), is that your user account might not have ownership of them any more. And you might not be able to delete the or move them around.

There is a workaround though. You can create a small PHP script containing the commands you want to carry out and upload it to the server. Once uploaded, you can run it from your web browser by entering the URL for it. The script will run as the user account the webserver runs as. Be sure to remove the script after you have used it though.

simple case:

Important: this code should only be used if you remember to delete it immediately after use. As above, its use may put your site into an insecure state.


<?php
file_fix_directory(dirname(__FILE__));
function file_fix_directory($dir, $nomask = array('.', '..')) {
if (is_dir($dir)) {
// Try to make each directory world writable.
if (@chmod($dir, 0777)) {
echo "<p>Made writable: " . $dir . "</p>";
}
}
if (is_dir($dir) && $handle = opendir($dir)) {
while (false !== ($file = readdir($handle))) {
if (!in_array($file, $nomask) && $file[0] != '.') {
if (is_dir("$dir/$file")) {
// Recurse into subdirectories
file_fix_directory("$dir/$file", $nomask);
}
else {
$filename = "$dir/$file";
// Try to make each file world writable.
if (@chmod($filename, 0666)) {
echo "<p>Made writable: " . $filename . "</p>";
}
}
}
}
closedir($handle);
}
}
?>


How to install LAMP server on Ubuntu

LAMP, which stands for Linux, Apache, MySQL and PHP, is a popular open-source web server platform on Linux. The LAMP stack has been enjoying tremendous popularity among website administrators, due to its stability, open-source nature, and excellent community support.

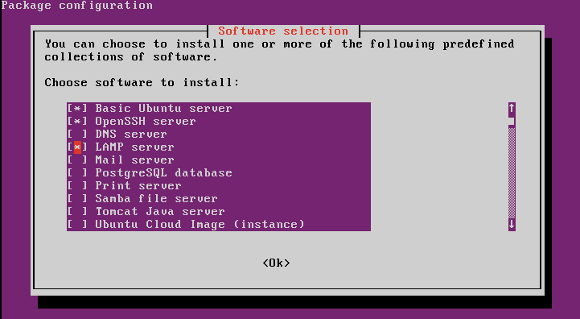
To install LAMP server on Ubuntu, you can use a command line tool called taskselwhich allows you to (un)install various tasks, each of which is basically a collection of related packages. So just run tasksel command, and choose “LAMP server” option among a list of available tasks. The rest of installation procedure will be taken care of by the tool.

While tasksel is installed by default on Ubuntu Server, it is not available on vanilla Ubuntu Desktop. So if you are using Ubuntu Desktop, you need to install it first.

$ sudo apt-get install tasksel

Then go ahead and launch tasksel to install LAMP server on your system.

$ sudo tasksel

Install LAMP server on Ubuntu

On tasksel screen, any pre-installed task(s) will have asterisk mark next to its name. All you have to do is check “LAMP server” option, press TAB to move to “OK”, and press “ENTER”.

Once installation is completed, PHP-enabled Apache HTTP server as well as MySQL server will be up and running on your host, and are set to start automatically upon reboot.

Fonte:http://xmodulo.com

PHP – Retrieving XML With Curl and SimpleXML – PHP Tutorials

Retrieving XML With Curl and SimpleXMLIntroductionPHP 5 introduces SimpleXML and its a perfect name as parsing XML data is truly simple. In this tutorial we&apos;ll be using curl to retrieve the XML data from a remote web server. We&apos;re going to create a class to connect to the remote web server and pass POST data to the server and based on the POST data the remote server will return valid XML. The class will parse the XML response and return an array containing the data. For the sake of simplicity in this tutorial we&apos;re not going into detail on the workings of the remote server generating the XML responses.

The first thing we&apos;re going to cover is the simple script used to call the class.

<?
$URL = ‘http://www.example.com/XML’;
$request = ‘getInventory’;
$parameters = array(“param1” => “value1”, “param2” => “value2″);

$XMLClass = new getXML;
$response = $XMLClass->pullXML($URL,$request,$parameters);
?>

This simple script is all that is needed to use the class. We need to set the URL, request, and attributes being passed for the request. The $XMLClass = new getXML initializes the getXML class discussed later on in the tutorial. The response data of the request is stored in $response. For this example we’re going to use the following XML.

<?
<xml>
<data>
<row attribA=”valueA” attribB=”valueB”/>
<row attribA=”valueC” attribB=”valueD”/>
</data>
</xml>
?>

var_dump($response)  would be
array2 { [0]=> array2 { [“attribA”]=> string6 “valueA” [“attribB”]=> string6 “valueB” } [1]=> array2 { [“attribA”]=> string6 “valueC” [“attribB”]=> string6 “valueD” } }

Creare un componente per Joomla 1.5, lato amministrazione

Customize a Backend Component in Joomla 1.5

Joomla! is one of the world&apos;s top open source content management systems. The main sources of the PHP MySQL application&apos;s success are its comprehensive extension libraries, which extend Joomla! far beyond content management, and it&apos;s very active forums where one can easily tap into the knowledge of other Joomla! users, administrators, and developers.

In this article by Chuck Lanham and James Kennard, author of Mastering Joomla! 1.5 Extension and Framework Development, we will cover:

* Pagination using JPagination class

* How to Modify the Submenu

* The joomla.html library

* How to Build better layouts and templates

from: Creare un componente per Joomla 1.5, lato amministrazione.

How to watermark all your uploaded images | WP Glamour

How to watermark all your uploaded images

How many of you wanted to place a watermark on all of your images?

Let&apos;s say you are just starting your own blog and the first solution that comes to mind is to fire up Adobe Photoshop or any other image editing program and place a watermark on all your images. It is time consuming but it will work.

But what if you have a blog for a really long time and you just decided you want to watermark all your images? You would have to copy all your images from your blog to your computer, open all of them up and add a watermark. Not good.

But what about the original images? What if you ever need them without the watermark?

Here is my solution. I have been using this on a number of blogs and it does the job really well.

What we are going to do is fake the display of an image. What we are displaying instead of the image is a php file that processes the image and ads a watermark to it. The url of the image stays the same, the watermark gets printed on the image and best of all the image on the server doesn&apos;t stays intact.

All you need is a bit of code in your .htaccess file, a php watermark processing file and a watermark image (png preferably).

Da: How to watermark all your uploaded images | WP Glamour.

PHP ICalendar Email Code – iCal

Inviare una mail con l’appuntamento da aggiungere al calendario

Working diligently day and night (oh, the commitment) to tackle PHP iCal emails, I finally got some code working. I was amazed at how few examples I could find, the majority of which would not work. The single biggest problem with getting this working was making those Accept, Deny, Tentative buttons appear in Outlook.

As the meeting organizer, you do not need to respond to the meeting

Lies! This was caused by the actual headers and encoding of the email rather than the content of my iCal information. Anyway, after 2 days (and evenings) of trying to get this working I finally broke through at 3pm today!

Continue reading

iCal Creator (cms, iCal, agenda) – PHP Classes

iCalcreator is a PHP implementation to create, parse and edit iCal (rfc2445) files for non-calendar systems like CMS, project management systems, and other applications able to support calendar information like agendas, tasks, reports, todo lists, journaling data and communicate with calendar applications.

Da: iCal Creator (cms, iCal, agenda) – PHP Classes.

Plugin Website: http://www.kigkonsult.se/iCalcreator/index.php

E-mail in formato HTML con PHP | Articoli Php | Php.HTML.it

In questo articolo vedremo come sfruttare PHP per inviare e-mail in formato HTML. So già che qualcuno obbietterà che non è necessario utilizzare l&apos;HTML nella comunicazione via posta elettronica, che il puro testo è sufficiente oltre che più “leggero” e più sicuro. Questo va bene per noi programmatori, ma il resto del modo apprezza messaggi colorati, magari composti da qualche immagine o suono. Allora utilizziamo al meglio gli strumenti messi a disposizione da PHP per confezionare messaggi vivaci e ben formattati.

Partiamo dal presupposto che il file php.ini sia correttamente configurato nella sezione [mail function] per l&apos;invio di messaggi di posta elettronica. Per maggiori dettagli si rimanda all&apos;articolo La La funzione mail() o alla documentazione ufficiale.

Lo strumento principale che utilizzeremo sarà la funzione mail(). Tale funzione prevede cinque argomenti tre dei quali obbligatori: l&apos;indirizzo o gli indirizzi dei destinatari (basterà separarli con la virgola), l&apos;oggetto del messaggio, il testo del messaggio.

di: Ermanno Ancona da:

E-mail in formato HTML con PHP | Articoli Php | Php.HTML.it.

PHP-GTK NEWSLETTER & AGENDA – Invia Email e SMS dal tuo PC

PHP-GTK NEWSLETTER v2 b68

PHPGTK-AGENDA [b8] per WINDOWS e LINUX

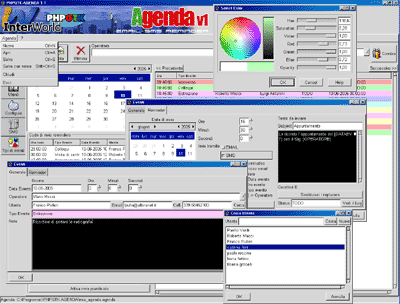
Prima Stable 😉 PHPGTK AGENDA nasce per rispondere alle esigenze di chi ha bisogno di gestire in modo pratico i propri appuntamenti. Tramite PHPGTK AGENDA si dispone di una leggera rubrica nella quale potrete memorizzare i nomi, le email e i cellulari dei vostri contatti, amici, parenti, clienti o piu&apos; in generale “Utenti”.

Continue reading