


Papa Francesco: “Dietro un corteo funebre non ho mai visto un camion da trasloco”
Chiedere a Dio la grazia di un cuore che sappia amare e non si lasci sviare da cose inutili. Questa la sostanza dell’omelia tenuta dal Pontefice: “Ci sono tesori rischiosi che dobbiamo lasciare, quelli accumulati durante la vita e che la morte vanifica. Ma ciò che abbiamo dato agli altri, lo portiamo”
Author Archives: Stefano Bortolamasi
Citazioni
Conquista te stesso, non il mondo.
Cartesio
La vita è come un caffè: se non ne assapori il gusto quando è amara, significa che non la ami veramente, e potrai aggiungere tutto lo zucchero che vorrai, rimarrà sempre insoddisfacente. Potrà diventare, perfino, troppo dolce.
La vita è come un’eco: se non ti piace quello che ti rimanda, devi cambiare il messaggio che invii.
La vita…
La vita è un mistero da vivere… non un problema da risolvere.
Non aspettare…
La vita non è aspettare che passi la tempesta, ma imparare a ballare sotto la pioggia.
Mahatma Gandhi
Le cicatrici…
Alla fine arriverà un tempo in cui i momenti difficili saranno solo storie da raccontare con orgoglio a chiunque vorrà udirle. E tutti le ascolteranno, pieni di rispetto, e apprenderanno tre insegnamenti fondamentali: Bisogna attendere con pazienza il momento opportuno per agire. Bisogna coltivare la saggezza che consente di non lasciarsi sfuggire le occasioni. Bisogna essere orgogliosi delle proprie cicatrici. Le cicatrici sono le medaglie che marchiano le carni e spaventano l’avversario, mostrando che ha di fronte un uomo che possiede una grande esperienza nel combattimento. Molte volte questo porterà l’altro a cercare il dialogo per evitare il conflitto. Le cicatrici sono più eloquenti della lama della spada che le ha provocate.
Removing ^M characters on ubuntu in VIM
It took me a while to figure out how to get rid of pesky ^M characters in VIM on ubuntu. ^M in VIM can be manipulated as it is an \r character. Often times other developers would edit python files in gedit or notepad and ^M characters would be inserted. I could not simply %s/\^M//g as “^M” was not a recognized character.
The fix is really quite simple and I was frustrated it took me so long to find, but in case it gets to anyone else – the ^M is a line feed character that is inserted by gedit(among other editors) sometimes. In VIM, it shows up as ^M, but it is actually a “\r” character. So, doing a replace for \r characters will remove the ^M
%s/\r//g
Terme in Austria e Germania
Ecco un itinerario attraverso i migliori complessi termali del Paese, qualche spunto per organizzare un soggiorno tutto benessere e salute.
Partendo dal salisburghese, la regione che si trova nel cuore dell’Austria, le possibilità di una vacanza wellness sono numerose: si parte dalle terme di Bad Vigaun, a meno di 20 km dal capoluogo Salisburgo, a Bad Hofgastein e Bad Gastein (nella Valle Gasteinertal). Queste due sono tra le località termali più note del Paese grazie alle proprietà curative delle acque (in particolare per le patologie reumatiche) ed alla possibilità di praticare numerose discipline sportive per tenersi in forma come sci, parapendio, golf, trekking, mountain bike ed equitazione.
Un’altra regione dove si trovano accoglienti centri termali è la Carinzia: a due passi dallo splendido Parco Nazionale Nockberge e dal Lago Millstattersee si trova Bad Kleinkircheim, una meta affascinante vista la presenza, oltre che delle terme, anche si impianti sportivi per praticare sci di fondo, snowboard e discesa. Altra località termale della Carinzia è Villac dove si trova una sorgente ricca di calcio e magnesio. Facilmente raggiungibile dall’Italia – dista soli 15 km da Tarvisio, il centro è immerso in uno scenario paesaggistico incantevole.
Tra le altre zone del Paese dove vi sono sorgenti e stabilimenti termali vi sono la Stiria ed il Tirolo. Partendo da quest’ultimo, tra le località più affascinanti e meglio attrezzate vi sono Langelfeld ed alcuni piccoli centri situati nella Valle di Otztal. Qui infatti i turisti verranno accolti in moderni impianti dotati di saune, centri fitness, biblioteche, sale per convegni, ristoranti, alberghi, aree giochi per bimbi e tanto altro. Langelfeld è anche un rinomato centro della movida notturna austriaca che si animano soprattutto in inverno dal momento che la cittadina è anche un importante centro sciistico. In Stiria vi sono diverse cittadine termali come Bad Radkersburg, Bad Gleichenberg, Loipersdorf, Bad Blumau, Bad Waltersdorf e Sebersdorf, non lontane dal capoluogo
Graz. Il successo termale della regione è dovuto al fatto che essa è attraversata da acque termali di origine vulcanica particolarmente indicate per trattamenti di salute e benessere viste le loro proprietà curative. Infine, una delle località termali più famose dell’Austria è Baden, a meno di 40 km da Vienna. Circondata da vigneti e da tanto verde, la cittadina era un importante centro termale già nei tempi della Roma antica. Anche in questo caso, come negli altri, sono sorti nei pressi delle sorgenti alberghi e ristoranti che ospitano i tantissimi austriaci e turisti che vengono qui a curarsi.
http://www.thermen.at/alle-thermen/
Tyrol
http://www.alpentherme-ehrenberg.at/home_1.html
http://www.erlebnistherme-zillertal.at/index.php/en
Salzburg
http://www.tauernspakaprun.com/it
http://www.felsentherme.com/en/
http://www.badvigaun.com/de/heiltherme/
Karinzia
http://kaerntentherme.com/kt-it/
http://www.badkleinkirchheim.at/thermal-roemerbad
Monaco
Garante Privacy: Niente Cookie senza consenso
Il Garante Privacy ha stabilito che è vietata l’installazione dei cookie per finalità di marketing senza consenso. Chi naviga in Rete potrà decidere se consentire l’utilizzo o meno delle informazioni collezionate sui siti visitati per ricevere pubblicità mirata. Il provvedimento è stato pubblicato sulla Gazzetta ufficiale. In precedenza era stata lanciata una consultazione pubblica.
L’authority, guidata dal garante Antonello Soro, vuole che i navigatori siano utenti informati. Il Garante ha individuato quattro modalità semplificate per portare l’informativa online e rendere gli utenti consapevoli sull’uso dei cookie. L’Authority ha offerto indicazioni per acquisire il consenso, ove richiesto dalla legge. Quando si accede all’home page o ad un’altra pagina di un sito web deve immediatamente comparire un banner ben visibile, in cuidevono risultare chiare le seguenti informazioni: innanzitutto, dev’essere indicato che il sito sfrutta cookie di profilazione per inviare messaggi pubblicitari mirati;in secondo luogo, deve essere esplicito che il sito permette anche l’invio di cookie di “terze parti”, cioè di cookie installati da un sito diverso tramite il sito che si sta visitando; in terzo luogo, deve essere segnalato un link a un’informativa più estesa, dove sia descritto l’uso dei cookie inviati dal sito e dove l’utente possa eventualmente negare il consenso alla loro installazione direttamente o collegandosi ai vari siti nel caso dei cookie di “terze parti”; infine, l’indicazione che continuando nella navigazione (anche solo accedendo ad un’altra area del sito o da un’immagine o un link) si concede il consenso all’uso dei cookie.
Il gestore del sito può utilizzare un cookie tecnico, in modo tale da evitare di riproporre l’informativa breve alla seconda visita dell’utente. L’utente mantiene, comunque, la possibilità di cambiare le proprie scelte sui cookie attraverso l’informativa estesa, che deve essere linkata da ogni pagina del sito. Il Garante ha predisposto un modello di banner disponibile sul proprio sito www.garanteprivacy.it.

Garante Privacy: Niente cookie senza consenso
Da anni ITespresso.it invita gli utenti a prendere l’abitudine, ogni tanto, di cancellare i cookie, creati sul proprio Pc. Sono piccoli file di testo che i siti visitati spediscono al dispositivo (computer, tablet, smartphone, notebook) dell’utente, dove vengono memorizzati, per poi essere ritrasmessi agli stessi siti a nuova visita. Sono usati per eseguire autenticazioni informatiche, monitoraggio di sessioni e memorizzazione di informazioni sui siti. In caso, è meglio conservare solo quelli dei siti web più visitati. I cookie sono poi utilizzati per “profilare gli utenti”, in base ai gusti, in modo da proporgli advertising mirato. Anche se i nomi, cognomi, indirizzi e-mail non rientrano nelle informazioni di cui le aziende pubblicitarie dispongono, il problema rimane, perché il browser fornisce altre informazioni, che abbinate con altri dati relativi alle abitudini di navigazione e attività di uno stesso individuo, possono fornire l’identikit di un utente. L’authority vuole che gli utenti acquisiscano consapevolezza su tutto ciò che può avvenire, a loro insaputa, riguardo ai propri dati.
25 trucchi SEO utili per le PMI

DVBT Raspberry Ais Receiver
AIS receiver for the Raspberry Pi
This is very much a work in progress…
Installing the RTL_SDR software
http://www.satsignal.eu/raspberry-pi/AIS-receiver.html
2013-Nov-19
This information is a direct copy of my write-up for installing the same software for the ADS-B dump 1090 program.
- sudo apt-get install git-core
- sudo apt-get install cmake
- sudo apt-get install libusb-1.0-0–dev
- git clone git://git.osmocom.org/rtl-sdr.git
- cd rtl-sdr
- mkdir build
- cd build
- cmake ../ -DINSTALL_UDEV_RULES=ON
- make
- sudo make install
- sudo ldconfig
- cd ~
- sudo cp ./rtl-sdr/rtl-sdr.rules /etc/udev/rules.d/
- sudo reboot
- rtl_test
- rtl_test -t (for E4000-based tuner)
SE NON FUNZIONA E restituisce il seguente errore:
usb_claim_interface error -6
Failed to open rtlsdr device #0
Some research told me that apparently this is caused by a conflict with the DVB-T kernel modules provided by the Linux kernel. There were two sugested remedies:
1) Blacklist the kernel modules using modprobe.d. You need to create a file /etc/modprobe.d/librtlsdr-blacklist.conf and put the following in it: “blacklist dvb_usb_rtl28xxu” (Without the quotes). I tried this, and it didn’t work – same error.
2) Option 2 – enable detaching the kernel module at compile time, when you build the rtl-sdr driver. This feature is disabled by default in the CMakeLists.txt file (for those interested, the changelog is here: http://ftp-master.metadata.debian.or….README.Debian
To enable it when building with cmake, you need the option: cmake ../ -DDETACH_KERNEL_DRIVER=ON
So the relevant section in your HowTo doc would become:
cd rtl-sdr
mkdir build
cd build
cmake ../ -DDETACH_KERNEL_DRIVER=ON -DINSTALL_UDEV_RULES=ON
make
sudo make install
sudo ldconfig
Installing the AIS Decoder software
From: http://forum.aishub.net/ais-decoder/ais-decoder-beta-release/new/
The basic instructions are:
- wget http://www.aishub.net/downloads/aisdecoder.tar.gz
- tar zxvf aisdecoder.tar.gz
- cd aisdecoder
- mkdir build
- cd build
- cmake ../ -DCMAKE_BUILD_TYPE=Release
At this point, the cmake command was not found, so I tried:
- sudo apt-get update
- sudo apt-get install cmake
and then repeated the command:
- cmake ../ -DCMAKE_BUILD_TYPE=Release
This resulted in the error messages:
— Build configuration: Release
CMake Error at CMakeLists.txt:54 (MESSAGE):
The development files for ALSA or PulseAudio are required – libasound-dev,
libpulse-dev
— Configuring incomplete, errors occurred!
So let’s try installing those packages, but first remove the file which tells cmake which packages were found or not. If you don’t do this, no amount of installing packages will help, and you can waste an entire morning chasing the problem, Been there, done that!
- rm CMakeCache.txt
- sudo apt-get install libasound-dev libpulse-dev
- make
2013-Dec-10
Not sure what’s happened (other than two reboots), but now running the cmake command works without errors:
— Build configuration: Release
— Configuring done
— Generating done
— Build files have been written to: /home/pi/AIS/aisdecoder/build
so next to link the radio receiver software with the AIS decoder program…
Altri link:
http://www.satsignal.eu/raspberry-pi/AIS-receiver.html
http://www.maritec.co.za/aisvdmvdodecoding/
http://gnuais.sourceforge.net/
http://gnuradio.org/redmine/projects/gnuradio/wiki/InstallingGR
http://de8msh.blogspot.it/2012/09/rtl-sdr-toolbox-on-linux-based-os.html
http://www.rtl-sdr.com/rtl-sdr-radio-scanner-tutorial-receiving-airplane-data-with-acars/
http://atlantic-source.com/blog/how-to-connect-ais-receiver-or-transponder-to-opencpn-software/
http://www.raspberrypi.org/forums/viewtopic.php?f=63&t=23478
http://forum.43oh.com/topic/4833-potm-daisy-a-simple-ais-receiver/
http://www.coaa.co.uk/epirbplotter.htm
http://www.rtl-sdr.com/wp-content/uploads/2013/05/gr-ais_in_SuSE12.3.en_.v.1.pdf
http://forum.aishub.net/ais-decoder/ais-decoder-beta-release/
http://forum.flightradar24.com/threads/6133-Raspberry-Pi-type-B-DVB-T-Dongle-to-feed-FR24/page33
Installing Raspberry Operating System Images on Linux
Please note that the use of the dd tool can overwrite any partition of your machine. If you specify the wrong device in the instructions below you could delete your primary Linux partition. Please be careful.
- Run
df -hto see what devices are currently mounted.
- If your computer has a slot for SD cards, insert the card. If not, insert the card into an SD card reader, then connect the reader to your computer.
- Run
df -hagain.
The new device that has appeared is your SD card. The left column gives the device name of your SD card; it will be listed as something like/dev/mmcblk0p1or/dev/sdd1. The last part (p1or1respectively) is the partition number but you want to write to the whole SD card, not just one partition.
Therefore you need to remove that part from the name (getting, for example,/dev/mmcblk0or/dev/sdd) as the device for the whole SD card.
Note that the SD card can show up more than once in the output of df; it will do this if you have previously written a Raspberry Pi image to this SD card, because the Raspberry Pi SD images have more than one partition. - Now that you’ve noted what the device name is, you need to unmount it so that files can’t be read or written to the SD card while you are copying over the SD image.
- Run
umount /dev/sdd1, replacing
sdd1with whatever your SD card’s device name is (including the partition number). - If your SD card shows up more than once in the output of
dfdue to having multiple partitions on the SD card, you should unmount all of these partitions. - In the terminal, write the image to the card with the command below, making sure you replace the input file
if=argument with the path to your.imgfile, and the/dev/sddin the output fileof=argument with the right device name. This is very important, as you will lose all data on the hard drive if you provide the wrong device name. Make sure the device name is the name of the whole SD card as described above, not just a partition of it; for examplesdd, notsdds1orsddp1; ormmcblk0, notmmcblk0p1.dd bs=4M if=2014-06-20-wheezy-raspbian.img of=/dev/sdd - Please note that block size set to
4Mwill work most of the time; if not, please try1M, although this will take considerably longer. - Also note that if you are not logged in as root you will need to prefix this with
sudo. - The
ddcommand does not give any information of its progress and so may appear to have frozen; it could take more than five minutes to finish writing to the card. If your card reader has an LED it may blink during the write process. To see the progress of the copy operation you can runpkill -USR1 -n -x ddin another terminal, prefixed with
sudoif you are not logged in as root. The progress will be displayed in the original window and not the window with thepkillcommand; it may not display immediately, due to buffering. - Instead of
ddyou can usedcflddit will give a progress report about how much has been written.
- You can check what’s written to the SD card by
dd-ing from the card back to another image on your hard disk, and then runningdiff(ormd5sum) on those two images. There should be no difference. - Run
syncthis will ensure the write cache is flushed and that it is safe to unmount your SD card.
- Remove the SD card from the card reader.
How to mount Moto G on Ubuntu using MTP
Moto G is an Android smartphone that does not have a microSD slot. So, the storage of the smartphone cannot be extended. If you want to transfer files between your Ubuntu computer and the Moto G, there are 3 possible ways to do that: FTP over wireless, PTPover USB and MTP over USB.
If your Ubuntu computer has wireless, I highly recommend using FTP over wireless. It is convenient (no wires!), offers good transfer speed and the entire /sdcard contents are available for read and write.
If your Ubuntu computer does not have wireless, then your next option is to use a micro-USB-to-USB cable. The choices here are PTP and MTP. You can enable and switch between the two after you connect Moto G to your computer using a USB cable. If you enable PTP, then Moto G is automatically mounted as a partition in Nautilus. However, you will only be able to see the /sdcard/DCIM and /sdcard/Pictures directories. If you are transferring photos, then this option offers good transfer speed.
If your Ubuntu computer does not have wireless and you still want to read and write to the contents of /sdcard then the option left to you is MTP. Note that with MTP, Moto G takes a really long time to mount and the transfer speeds are really really low. It can take ages to transfer even a small file. You have been warned! 🙂
There are many solutions offered online to mount the contents of /sdcard using MTP.This solution is the only one that worked for me:
- Install the MTP packages:
$ sudo apt-get install mtp-tools mtpfs
- Connect Moto G using a USB cable to your computer. Make sure MTP is selected, and not PTP.
- Find out the vendor ID and product ID of Moto G using
mtp-detect. For my smartphone I got:
$ sudo mtp-detect
Unable to open ~/.mtpz-data for reading, MTPZ disabled.libmtp version: 1.1.3

Listing raw device(s)
Device 0 (VID=22b8 and PID=2e82) is UNKNOWN.
Please report this VID/PID and the device model to the libmtp development team
   Found 1 device(s):
   22b8:2e82 @ bus 1, dev 12
Attempting to connect device(s)
Android device detected, assigning default bug flags
You need to press Ctrl+C to stop the command. For the Moto G, you can see that the vendor ID is 22b8 and product ID is 2e82.
- Open a new file
/etc/udev/rules.d/51-android.rulesusingsudoand add this line:
SUBSYSTEM=="usb", ATTR{idVendor}=="22b8", ATTR{idProduct}=="2e82", MODE="0666"
- Restart the USB service and create a directory to mount the Moto G:
|
1
2
3
4
|
$ sudo service udev restart$ sudo mkdir /media/motog$ sudo chmod a+rwx /media/motog$ sudo adduser your-user-name fuse |
- Open the
/etc/fuse.conffile assudoand uncomment the line foruser_allow_other - Restart your computer. Connect back the Moto G to the computer.
- You can now mount the
/sdcardof your Moto G using this command:
$ mtpfs -o allow_other /media/motog/
Note that the mounting operation is slow and might take about a minute.
- You can find all the directories and files in
/sdcardof Moto G in/media/motog. You can read and write to these directories. - To unmount use this command:
$ fusermount -u /media/motog/
That is it! You may want to create aliases for the mount and unmount command to make it easy to use 🙂
Note: You will not get the USB mass storage option in Moto G since that can be provided for external storage, not for partitions from which the Linux kernel is currently running. And in any case, you will need root access on the phone to touch those directories.
Tried with: Moto G and Ubuntu 12.04
[SEO] Come posizionare il tuo sito in google dopo meno di 1 ora dalla registrazione del dominio
Nell’ultimo anno, ho sperimentato nuove nicchie, alcune redditizie altre un pò meno, tutto per guadagnare seriamente su internet, ma anche a scopo didattico per cercare scientificamente come permettere a google di indicizzare un Dominio appena acquisto tra le serp, senza dover attendere settimane.
In realtà, ho trovato una soluzione, abbastanza scientifica che mi permette di includere un blog su un Dominio personalizzato e su un web hosting decente in pochissimo tempo, tutto senza dover ricorrere a trucchi particolari o ad altri sotterfugi, ma utilizzando semplicemente gli strumenti messi a disposizione dal repository di WordPress e da Google stesso.
Cosa Fare su WordPress:
- La prima e sicuramente più importante cosa da fare su WordPress, dopo averlo installato sul tuo Dominio
e sul tuo hosting è quella di cancellare immediatamente la pagina “Pagina di Esempio” e l’articolo “Ciao Mondo“, altrimenti, posso garantirtelo, saranno i primi ad essere indicizzati.
- Se hai creato il tuo blog in una sandbox (a dire il vero anche se non lo hai fatto) è arrivato il momento di pubblicare i tuoi primi articoli, ne bastano un paio, ma se ne hai da scrivere di più che ben venga;
- Adesso dovresti installare il plugin Google XML Sitemap che puoi trovare nella sezione dei plugin gratuiti da wordpress, o installarlo dalla tua bacheca sotto “Plugin->Aggiungi Nuovo”
- Scaricalo, installalo e attivalo; per il momento potrai chiudere il tuo blog; ci ritorneremo più tardi.

Utilizzare Google Webmaster Tools:
A questo punto è arrivato il momento di utilizzare google Webmaster tools per includere il tuo nuovo blog su google, e per inviare la sitemap, l’operazione è più semplice a farsi che a dirsi, ma ci proverò lo stesso.
- Collegati al sito di Google Webmaster tools e accedi con il tuo account Google, se non ne hai uno, puoi crearlo gratuitamente ottenendo così anche un indirizzo di posta elettronica Gmail.
- Sulla destra c’è un pulsante, anche abbastanza discreto visto che ha lo sfondo rosso che dice “Aggiungi Un sito”, cliccaci su ed inserisci l’indirizzo del sito nel formato www.sito.com, senza inserire http://.
- Dopo aver inserito l’url, dovrai verificare la proprietà del sito, potrai farlo caricando via FTP il file che ti fa scaricare google, e cliccando su verifica sito.
- Terminata l’operazione precedente, non ti resta che inviare la sitemap, che nel frattempo è stata creata in automatico dal plugin che hai scaricato ed installato sul tuo blog in precedenza.
- Per inviare la sitemap, sempre nel google webmaster tools spostati nella sezione “Ottimizzazione” e poi “Sitemap” anche qui un pulsante ti indicherà chiaramente come inserire la sitemap del tuo sito cliccaci su e nel campo di testo che apparirà inserisci “sitemap.xml.gz“.
- Se sotto la voce “stato” apparirà “In Attesa” vuol dire che hai fatto tutto bene
Ora ti basterà andarti a fumare un paio di sigarette, farti un caffè o una doccia, e quando tornerai, il tuo blog sarà già su google, comunque controlla digitando l’indirizzo dello stesso sul motore di ricerca.
Fonte: www.wpcode.net
Eliminare tutte le tabelle di un Db MySQL senza eliminare il db stesso
Può capitare che hosting di servizi come Aruba, non vi facciano eliminare il db che vi hanno messo a disposizione.
E’ perciò necessario riuscire ad eliminare in un solo colpo tutte le tabelle presenti senza perdere troppo tempo
Interveniamo perciò con questa query:
SELECT concat('DROP TABLE IF EXISTS ', table_name, ';')
FROM information_schema.tables
WHERE table_schema = 'MyDatabaseName';
Che mi restituisce un elenco di tutte le tabelle presenti aggiungendo già la parte DROP TABLE…
Copio il risultato della queti nuovamente nello spazio SQL
Aggiungo prima e dopo l’opzione di ignorare i FOREIGN_KEY
SET FOREIGN_KEY_CHECKS=0;
DROP TABLE table1...;
DROP TABLE table1...;
SET FOREIGN_KEY_CHECKS=1;
Installing VNC server in Raspberry Pi running Raspbian
This guide assumes you already have Raspbian OS installed in your Raspberry Pi. VNC is very useful when we intend to manage our Raspberry Pi remotely. This means we don’t need a separate display, keyboard and mouse. Just leave Raspberry Pi on and connected to local network, and we can remotely access it from other computer with VNC client.
 Before installing new application or service in Raspbian, make sure to always type this into terminal :
sudo apt-get update
sudo apt-get upgrade
sudo apt-get dist-upgrade
If you’re installation is not the latest version, it might take a while as Raspbian will download the latest files from Internet. My Raspbian image file is dated 9 Feb 2013. Different version of Raspbian might produce different behavior.
Now, open terminal again and type:
sudo apt-get install tightvncserver
This will install TightVNC into Raspbian system.
Next, we need to do first-time run to set the password. Type this into terminal:
tightvncserver :1
Then enter your desired password (8 characters) for VNC connection.
Having VNC executed with user action does not serve the purpose of preparing Raspberry Pi for remote access. We need to add VNC server into startup sequence. There are more than one ways to do this, but I’ll use an easy one.
As usual, type this into terminal:
wget http://www.robertsetiadi.net/download/tightvncserver-init.txt
sudo mv tightvncserver-init.txt /etc/init.d/tightvncserver
Credit to PenguinTutor for the script. You may need to change the variable on line 16. It is currently set to pi (the default username on the Raspbian OS image). Set this to whatever username you want to login to TightVNC as, but do not put root as the user.
sudo chown root:root /etc/init.d/tightvncserver
This is to change the ownership of the file (set to belong to root).
sudo chmod 755 /etc/init.d/tightvncserver
This is to make the file executable.
sudo update-rc.d tightvncserver defaults
This is to add the script to startup.
Just for additional information, you can manually start VNC by:
sudo /etc/init.d/tightvncserver start or sudo /etc/init.d/tightvncserver stop
Now you need to know the IP address of your Raspberry Pi.
ifconfig eth0 (if you’re using network cable)
ifconfig wlan0 (if you’re using WiFi)
Finding MAC address: (this command is actually not needed for VNC)
cat /sys/class/net/eth0/address (if you’re using network cable)
cat /sys/class/net/wlan0/address (if you’re using WiFi)
You might also want to make your Raspberry Pi having a static IP address:
sudo nano /etc/network/interfaces
Then change this line:
iface eth0 inet dhcp
into:
iface eth0 inet static
and add the following lines below the iface line:
address 192.168.1.8 (change this with your desired address for the Pi)
netmask 255.255.255.0
network 192.168.1.1
broadcast 192.168.1.255
gateway 192.168.1.254
Of course, you should adjust the lines according to your network settings.
The next step is to install VNC client in another computer and test the connection. This will depend on which operating system it uses and which VNC client you prefer. For the connection, you will need Raspberry Pi’s IP address and port. For the port, try 1 or 5901. I am using Chicken VNC in Mac and can connect without any problem.
Lastly, a quick tip. In VNC mode, I was unable to shutdown my Raspberry Pi using GUI. The only option available is “Log Out”. Type this into terminal to perform manual shutdown:
sudo shutdown -hP now
Raspberry PI boot to browser
Fonte: Nejc Zupan at Jan 22, 2013 12:51 PM | Permalink
Here at NiteoWeb, we use various SaaS monitoring and logging providers such as Librato Metrics and Papertrail to keep on top of our Plone and Pyramid projects. Hence the need to have a wall-mounted screen to display various graphs and outputs these services. What better way to drive the screen than a Raspberry Pi!
Getting the Raspberry Pi to boot into X and connect to the net was fairly trivial, just follow the official docs. However, getting the Pi to boot directly into a browser (also called “kiosk” mode) required some research. This is how I’ve done it in the end:
- Disable screen sleep — so the screen stays on
$ sudo nano /etc/lightdm/lightdm.conf # add the following lines to the [SeatDefaults] section
# don't sleep the screenxserver-command=X -s 0 dpms - Hide cursor on inactivity
$ sudo apt-get install unclutter
- Configure LXDE to start the Midori browser on login
$ sudo nano /etc/xdg/lxsession/LXDE/autostart

# comment everything and add the following lines

@xset s off
@xset -dpms
@xset s noblank
@midori -e Fullscreen -a http://plone.org
# don’t sleep the screenxserver-command=X -s 0 dpms
Using Raspberry Pi to run a shop window slideshow
SiteShow.htm
Author: Troy Wolf (troy@troywolf.com)
Modified Date: 2006-05-24
What is it?
SiteShow is a very easy to use, self-contained HTML/CSS/Javascript page that facilitates a slideshow of web pages. Each web page becomes a “slide” in the show. The pages can be your own web content, direct links to images, or any other web page on the Internet.
See it in action! See the source code
Things you should know
SiteShow uses an IFRAME to contain the slide pages. If any of your slide pages have script to force itself out of a frameset, the page will obviously break the show.
If any of your slide pages are slow loading, it detracts from the show’s effect. Not my problem. 🙂 I designed the show for use on an Intranet for display in a company’s lobby. In this environment, the show works fantastic.
SiteShow works best in IE. I welcome suggestions to make it work better in Mozilla/Firefox. The issues in Firefox are:
- The fading in and out is a bit jerky. It is smooth in IE.
- The SiteShow body background color is inherited by the slide pages. This can produce undesirable results. This is not a problem in IE.
TIP: Use SiteShow in your browser’s full-screen mode (F11 key).
Features
- Easily define as many slides as you want. For each, you specify a title, URL, and duration time in seconds.
- SiteShow Menu allows people to pause, play, or go directly to any specific slide. The menu auto-fades in on page mouseover. It auto fades-out after a few seconds.
- Modify the fade out color by changing the CSS background-color.
- Requires zero server-side code. Entire utility is contained in a single, simple, client-side page.
How do I use it?
Simply copy the page source below into a new HTML file then edit the slides[] array in the Javascript.
<!DOCTYPE HTML PUBLIC "-//W3C//DTD HTML 4.01 Transitional//EN">

<!--

SlideShow v1.0

Troy Wolf <troy@troywolf.com>

Simply define your "slides" in the javascript slides[] array below.

-->

<html>

<head>

<title>SiteShow 1.0</title>

<meta http-equiv="content-type" content="text/html; charset=windows-1250">
<style>

/* Change body background-color to change fade out color. */

body.siteshow { margin:0; padding:0; background-color:#000000; }

#menu

{

font-family:Arial;

font-size:9pt;

display:none;

opacity:0.00;

-mozopacity:0.00;

filter:alpha(opacity=0);

position:absolute;

top:10px;

left:10px;

padding:5px;

background-color:#000000;

color:#FFFFFF;

border:3px dotted #999999;

}

#menu a { color:#ffffff; }

#menu a:hover { text-decoration:none; }

#title { font-size:11pt; font-weight:bold; letter-spacing:2; }

#slides { font-size:9pt; line-height:16pt; }

.button { width:60px; font-size:9pt; letter-spacing:1; }

</style>
<script type="text/javascript">

var current_idx = 0;

var slides = new Array();

var menuwin;

var show_timer;

var menu_timer;

var menu;

var content;

var loaded = true;
// Define your "slides". 3 values for each are:

//      1. Duration in seconds.

//      2. Title to be used in menu.

//      3. Source URL. Can be full URI or a relative URL.

slides[1] = new Array(15, "WAMP HOWTO", "http://www.troywolf.com/articles/wamp_howto.htm");

slides[2] = new Array(15, "PHP Proxy", "http://www.troywolf.com/articles/php/class_http/proxy.phps");

slides[3] = new Array(15, "HTTP class", "http://www.troywolf.com/articles/php/class_http/");

slides[4] = new Array(15, "Session class", "http://www.troywolf.com/articles/php/class_session/");

slides[5] = new Array(15, "RSS Consumption", "http://www.troywolf.com/articles/php/class_xml/rss_example.php");

slides[6] = new Array(15, "PHP Exchange WebDAV", "http://www.troywolf.com/articles/php/exchange_webdav_examples.php");

slides[7] = new Array(15, "vCard class", "http://www.troywolf.com/articles/php/class_vcard/");
function MenuInit()

{

var html = "";

for(idx=1; idx<slides.length; idx++) {

html += '<a href="javascript:Navigate('+idx+')">' +

slides[idx][1] + "</a><br />\n";

}

document.getElementById("slides").innerHTML = html;

menu.style.display = "block";

}
function MenuShow()

{

clearTimeout(menu_timer);

opacity('menu', 0, 90, 500);

menu_timer = setTimeout("MenuHide()", 3500);

}
function MenuHide()

{

opacity('menu', 90, 0, 500);

}
function Pause()

{

clearTimeout(show_timer);

document.getElementById('play').style.display = "block";

document.getElementById('pause').style.display = "none";

}
function Navigate(slide_idx)

{

clearTimeout(show_timer);

if (current_idx == 0) {

if (!slide_idx) { slide_idx = 1; }

current_idx = slide_idx;

content.src = slides[current_idx][2];

document.getElementById('play').style.display = "none";

document.getElementById('pause').style.display = "block";

show_timer = setTimeout("Navigate()", slides[current_idx][0]*1000);

return;

}
if (slide_idx) {

current_idx = slide_idx;

content.src = slides[current_idx][2];

document.getElementById('play').style.display = "block";

document.getElementById('pause').style.display = "none";

return;

}
loaded = false;

current_idx++;

if ( current_idx == slides.length) { current_idx = 1; }

opacity('content', 100, 0, 500);

document.getElementById('play').style.display = "none";

document.getElementById('pause').style.display = "block";

show_timer = setTimeout("Navigate()", slides[current_idx][0]*1000);

return;

}
function opacity(id, opacStart, opacEnd, millisec)

{

//speed for each frame

var speed = Math.round(millisec / 100);

var timer = 0;
//determine the direction for the blending, if start and end are the same nothing happens

if(opacStart > opacEnd) {

for(i = opacStart; i >= opacEnd; i--) {

setTimeout("changeOpac(" + i + ",'" + id + "')",(timer * speed));

timer++;

}

if (opacEnd == 0) { setTimeout("FadeOutTrigger('"+id+"')",((timer-1) * speed));; }

//if (opacEnd == 0) { FadeOutTrigger(id); }

} else if(opacStart < opacEnd) {

if (opacStart == 0) { FadeInTrigger(id); }

for(i = opacStart; i <= opacEnd; i++)

{

setTimeout("changeOpac(" + i + ",'" + id + "')",(timer * speed));

timer++;

}

}

}
//change the opacity for different browsers

function changeOpac(opacity, id)

{

var object = document.getElementById(id).style;

object.opacity = (opacity / 100);

object.MozOpacity = (opacity / 100);

object.KhtmlOpacity = (opacity / 100);

object.filter = "alpha(opacity=" + opacity + ")";

}
function FadeOutTrigger(id)

{

//alert('FadeOut: '+id);

switch(id) {

case "menu":

document.getElementById(id).style.display = "none";

break;

case "content":

content.src = slides[current_idx][2];

//setTimeout("opacity('content', 0, 100, 500)", 1000);

break;

default:

break;

}

}
function FadeInTrigger(id)

{

//alert('FadeIn: '+id);

switch(id) {

case "menu":

document.getElementById(id).style.display = "block";

break;

case "content":

//opacity('content', 0, 100, 500);

break;

default:

break;

}

}
function FadeInContent()

{

if (!loaded) {

opacity('content', 0, 100, 500);

loaded = true;

}

}
function LoadTrigger()

{

//self.resizeTo(1366,768);

menu = document.getElementById('menu');

content = document.getElementById('content');

Navigate();

MenuInit();

MenuShow();

}
window.onload = LoadTrigger;
</script>
</head>

<body>

<iframe id="content" name="content" style="width:100%; height:100%;" frameborder="no" scrolling="auto" src="" onmouseover="MenuShow();" onload="FadeInContent();" ></iframe>

<div id="menu">

<div id="title">SiteShow Menu</div>

<div id="slides">

</div>

<p>

<input id="pause" style="display:block;" type="button" value="pause" onclick="Pause()" />

<input id="play" style="display:none;" type="button" value="play" onclick="Navigate()" />

</p>

</div>

</body>

</html>
Unicode in 5 minuti
 Oggi giorno nessun programmatore può ignorare Unicode: con la diffusione di Internet e la pubblicazione dei contenuti via web è diventato impossibile non conoscere questo sistema di caratteri e, grazie al fatto che sono sempre di più i linguaggi di programmazione che lo trattano in maniera nativa, è diventato molto semplice poterlo adoperare nelle proprie applicazioni. Sicuro??!?!
A leggere in giro nella rete sembrerebbe esattamente il contrario. Praticamente tutti i giorni si legge di programmatori disperati che non sanno come trattare stringhe di testo contenenti caratteri Unicode, e spesso le soluzioni trovate sono alquanto naïf e sbagliate. Insomma, lo Unicode è per mia esperienza la bestia nera degli informatici del nuovo millennio, nonostante il web sia pieno di ottimi tutorial molto completi per approfondire la materia.
E forse è proprio questo il nocciolo della questione: le guide, i tutorial, gli howto elaborati per i vari linguaggi di programmazione spesso sono troppo completi ed esaustivi. Per carità, lungi da voler criticare il lavoro svolto da altre persone, ma per mia esperienza personale in questo tema più si tiene basso il livello e meglio si comprende qual è esattamente il problema. Per poi successivamente magari approfondire tutti i dettagli per gli amanti della storia dell’informatica.
In questo mini tutorial mi propongo di trascodificare su carta l’esperimento effettuato alla PyCon Due, e cioè presentare Unicode in soli 5 minuti. Si, avete capito bene. Vi chiedo di impiegare soltanto 5 minuti del vostro tempo, in cui vi impongo di rilassarvi e di dimenticare tutto quello che avete letto in giro fino ad ora.
Per illustrarvi gli esempi adopererò i linguaggi di programmazione Python e Java, ma sappiate che tutto quello che dirò potrà essere direttamente riportato in qualunque altro linguaggio di programmazione come C#, Visual Basic.NET, ecc – se vi aspettavate di leggere anche ‘PHP’ sappiate che ancora oggi, con PHP5, non c’è un supporto nativo alle stringhe Unicode.
Relax. Respiro profondo. Via.
Minuto 1 – Lo standard ASCII 7-bit non è in grado di rappresentare tutti i caratteri di tutti gli alfabeti esistenti
L’ ASCII è uno standard di codifica dei caratteri che associa i numeri da 0 a 127 ad un carattere ben preciso (non bisogna dimenticare che i computer sanno trattare esclusivamente numeri). Nello specifico, soltanto i numeri da 32 a 126 corrispondono a caratteri stampabili, tutti gli altri sono i cosiddetti caratteri di controllo. I caratteri contemplati dallo standard ASCII sono soltanto i caratteri dell’alfabeto latino (dalla A alla Z, maiuscoli e minuscoli). So già a cosa state pensando: “ma sulla mia tastiera ci sono anche le vocali accentate“. Ebbene questo è un punto di confusione: lo standard ASCII originario a 7 bit fu successivamente esteso a 8 bit per contemplare caratteri di alfabeti specifici (si parla per l’appunto di ASCII esteso). Questi 128 caratteri in più furono adoperati per codificare lettere specifiche dei singoli alfabeti, come le vocali accentate. Il compito di rimappare i codici numerici a lettere di un alfabeto era demandato ai cosiddetti codepage, che nel caso dell’alfabeto italiano (e non solo) per i PC equipaggiati con MS-DOS era il codepage 850. Tuttavia, se 128 caratteri aggiuntivi sono sufficienti a rappresentare tutti i caratteri degli alfabeti dei paesi ‘occidentali’ (comprese le vocali accentate, lettere con dieresi, ecc), non lo sono affatto per quei paesi i cui alfabeti superano abbondantemente tale numero di caratteri (si pensi agli ideogrammi cinesi). Insomma,
l’ASCII non è lo standard idoneo per trattare tutti gli alfabeti esistenti.
Minuto 2 – UNICODE è uno standard che associa ad un carattere un solo codice numerico
Per aggirare questa intrinseca limitazione dell’ASCII, le principali aziende del settore informatico unirono i loro sforzi per formare un consorzio con l’obiettivo di standardizzare tutti i caratteri esistenti in tutti gli alfabeti possibili: lo Unicode Consortium.
Lo Unicode è uno standard che assegna univocamente un numero ad ogni carattere di scrittura testi, indipendentemente dalla lingua, dalla particolare piattaforma software, dalla sua specifica rappresentazione in bit. Con Unicode ogni carattere ha il suo numero e non esistono caratteri con lo stesso numero. Ad esempio, il numero in base dieci 224 corrisponde alla lettera ‘à’; mentre il numero in base dieci 1590 alla lettera araba ‘sad’ (ض). In realtà i codici Unicode sono rappresentati in esadecimale, con 4 o 6 cifre, e nello specifico nella forma ‘U+XXXX’. Ad esempio, la lettera accentata ‘à’ ha rappresentazione ‘U+00E0′, mentre la lettera araba ‘sad’ (ض) ha rappresentazione ‘U+0636′.
Usare Unicode è semplicissimo e bastano pochissimi passi.
- Dirigetevi sul sito web di Unicode e nello specifico nella sezione ‘code charts‘;
- Scegliere una tavola di una famiglia di caratteri, ad esempio la tavola latin1 della famiglia degli alfabeti europei;
- Vi apparirà un documento PDF contenente la tavola dei caratteri latin1, (di cui sotto è riportato un estratto), ed incrociando i valori delle colonne con quelli delle righe è possibile ottenere il codice Unicode del carattere desiderato.

Come possiamo sfruttare le tavole Unicode nei nostri programmi? Beh, nulla di più semplice: si riporta banalmente il codice Unicode del carattere desiderato nelle stringhe di testo in formato Unicode, usando la sequenza di escape ‘\uXXXX’, dove XXXX è il codice esadecimale Unicode.
Ad esempio, in Python basta scrivere:
>>> data = u'\u00E0'

>>> print data

à
In Java, è praticamente la stessa cosa:
public class Prova {

public static void main(String[] args) {

String data = "\u00e0";

System.out.println(data);

}

}
Fine. Non c’è nessun altra informazione da aggiungere. Unicode è semplicemente questo, ed è importante sottolineare che lo Unicode non dice NULLA su come questi caratteri debbano essere rappresentati in macchina (infatti, spesso si parla di caratteri ‘idealizzati’). Questo significa che da solo Unicode non basta a poter trattare i testi con questa codifica. Insomma,
Unicode è uno standard che assegna univocamente un numero ad ogni carattere di scrittura testi, indipendentemente dalla lingua, dalla particolare piattaforma software, dalla sua specifica rappresentazione in bit
Minuto 3 – Un codec è una funzione che data una sequenza di caratteri Unicode restituisce una stringa di byte
Come già detto nel minuto precedente, una stringa di caratteri Unicode è una sorta di stringa ‘idealizzata’, che necessita di un ulteriore trasformazione per poter essere salvata, scambiata tra sistemi, interpretata da un browser. Tale processo di trasformazione in stringa di byte (o anche stringa binaria) è demandato ad un codec. Questo è il passaggio più delicato ed è anche quello dove si hanno tutte le difficoltà con Unicode. ASCII era una codifica che si occupava di standardizzare sia i caratteri sia la loro rappresentazione in bit. Unicode al contrario, si limita a standardizzare i caratteri lasciando ai codec la seconda funzione.
Un codec non è altro che una funzione di trasformazione: dato un carattere Unicode restituisce la corrispondente sequenza di byte. Esistono diversi codec compatibili con Unicode e la maggior parte di loro non è in grado di codificare tutti i caratteri standardizzati dallo Unicode. Ad esempio, ISO-8859-1 è il codec di trasformazione dei caratteri dell’alfabeto latino che, ad esempio, associa alla lettera ‘à’ (U+00E0) la stringa di byte “\xe0” (questa procedura di trasformazione è anche detta encoding). ISO-8859-1 è un codec a lunghezza fissa, ossia associa sempre e solo un byte per i caratteri che può codificare (ad un codec specifico per l’alfabeto latino non potrete mai far codificare un ideogramma cinese).
UTF-8 (acronimo di Unicode Trasformation Format) è un altro codec, a lunghezza variabile, dove un carattere può essere rappresentato con un minimo di un byte fino ad un massimo di quattro byte. UTF-8 è in grado di rappresentare qualunque carattere dello standard Unicode e, ad esempio, associa la stringa di byte (due in questo caso) ‘\xc3\xa0‘ alla lettera ‘à’ (U+00E0).
Come fare per ottenere una stringa di byte a partire da una stringa idealizzata Unicode? Nulla di più facile. In Python possiamo fare questo per mezzo del metodo ‘encode()‘ di un oggetto unicode:
>>> a = u'\u00e0'

>>> a.encode('iso8859-1')

\xe0

>>> a.encode('utf8')

\xc3\xa0
In Java:
public class Prova {
public static void main(String[] args) throws java.io.UnsupportedEncodingException {
String data = "\u00e0";
byte[] byte_string = data.getBytes("UTF8");
System.out.println(byte_string);
}
}
L’operazione inversa a quella di encoding è il decoding di una stringa di byte per ottenere una stringa Unicode. Supponiamo di avere un file di testo, codificato con un dato encoding, ad esempio UTF-8. Per ottenere una stringa Unicode in Python avremo:
>>> ustr = open("filename").read().decode('UTF8')

>>> type(ustr)

<type 'unicode'>
In Java avremo:
<b>public class</b> Prova {
<b>public static void</b> main(String[] args) <b>throws </b>java.io.UnsupportedEncodingException {
<b>try </b>{
BufferedReader rdr = <b>new </b>BufferedReader(
<b>new </b>InputStreamReader(<b>new </b>FileInputStream(“filename”),
“UTF-8”));
String line = rdr.readLine();
System.out.println(line);
} <b>catch </b>(IOException exc) {
System.err.println(“I/O error”);
}
}
}
|
1
2
3
4
5
6
7
8
9
10
11
12
13
14
15
|
<b>import </b>java.io.*;
<b>public class</b> Prova {
<b>public static void</b> main(String[] args) <b>throws </b>java.io.UnsupportedEncodingException {
<b>try </b>{
BufferedReader rdr = <b>new </b>BufferedReader(
<b>new </b>InputStreamReader(<b>new </b>FileInputStream(“filename”),
“UTF-8”));
String line = rdr.readLine();
System.out.println(line);
} <b>catch </b>(IOException exc) {
System.err.println(“I/O error”);
}
}
}
|
La figura sotto schematizza il processo di encoding/decoding.

Riassumendo,
Un codec è una funzione di trasformazione di un carattere Unicode in una stringa di byte serializzabile in macchina
Minuto 4 – Per interagire con una stringa di byte è necessario conoscere l’encoding con cui è stata codificata
L’ultimo concetto importante da tenere bene a mente è che in generale è indecidibile dire una stringa di byte con quale encoding è stata generata. Ad esempio, consideriamo la sequenza di due byte ‘\xc3\xa0‘. Da umani non ci risulta difficile riconoscere che siamo alla presenza della lettera ‘à’ codificata in UTF-8. Tuttavia, nulla vieta di essere in presenza di due caratteri codificati con un codec a 1 byte. Ad esempio, in Python in maniera perfettamente lecita possiamo scrivere:
>>> print u'\u00E0'.encode('utf'8').decode('ISO-8859-1'), "-"

à -
Con questo frammento di codice stiamo dicendo: prendi il carattere Unicode U+00E0 (à), codificalo con l’encoding UTF-8 e la stringa di byte ottenuta decodificala con ISO-8859-1. Quello che otteniamo non è più il carattere originario di partenza, perché il primo byte ‘\xc3‘ viene interpretato come il carattere ‘Ã’ mentre il secondo ‘\xa0‘ come spazio, perché così contemplati dallo standard.
Questo esempio ci fa capire che quando si manipolano dati, qualunque sia la provenienza, è importante sapere con che codec sono stati codificati. Il caso più tipico si verifica quando si cerca di manipolare stringhe di byte con gli encoding di default, che nel caso di Python è ‘ascii’ su tutte le piattaforme (come configurato nel file site.py), mentre in Java è un parametro dipendente dal particolare sistema: su Windows è ‘cp1252′, come indicato dalla funzione System.getProperty(“file.encoding”), ed è possibile alterarlo alla riga di comando della JVM con il parametro -Dfile.encoding=<codec>.
Ad esempio, sempre dall’esempio di prima, adoperando l’encoding di default di Python abbiamo:
>>> data=open("curr.txt").read().decode()

Traceback (most recent call last):

File "C:\Documents and Settings\cnoviello\Desktop\pro.py", line 1, in <module>

data=open("curr.txt").read().decode('ascii')

UnicodeDecodeError: 'ascii' codec can't decode byte 0xef in position 0: ordinal not in range(128)
ottenendo un messaggio di errore molto noto a tutte le persone che hanno avuto a che fare con problemi di gestione dello Unicode. Altra alternativa è rappresentata dalla funzionalità di ‘replace’ della funzione ‘decode()‘: è possibile specificare al decodificatore di sostituire tutte le sequenze di byte che non hanno corrispondenza nel codec con il carattere di sostituzione Unicode U+FFFD (il famigerato � che tipicamente visualizzano i browser quando non sanno decodificare correttamente una sequenza di byte).
>>> print u'\u00e0'.encode('utf8').decode('ascii', 'replace')

��
E’ importante, quindi, che l’applicazione abbia una gestione consistente dell’encoding della fonte dati: si fissa un codec e si continuerà ad adoperarlo sempre. A meno di non sapere con esattezza che cosa si sta facendo. Ad esempio, è molto semplice convertire stringhe di byte codificate in un dato encoding sorgente in uno nuovo. Il seguente codice Java fa proprio questo:
//Si ricodifica la stringa dato un encoding prefissato
<b>byte</b>[] result = str.getBytes(targetEncoding);<b>return </b>result;
}
|
1
2
3
4
5
6
7
8
9
10
|
<b>public static byte</b>[] convert(<b>byte</b>[] data, String startEncoding, String targetEncoding) {
//Si decodifica la stringa di byte grazie al costruttore della
//classe String, ottenendo una stringa Unicode
String str = new String(data, srcEncoding);
//Si ricodifica la stringa dato un encoding prefissato
<b>byte</b>[] result = str.getBytes(targetEncoding);
<b>return </b>result;
}
|
Un discorso analogo può essere fatto nel caso dei documenti HTML. Ricordarsi sempre di specificare l’encoding dei propri documenti tramite la direttiva:
|
1
|
<<span class=”start-tag”>meta</span><span class=”attribute-name”> http-equiv</span>=<span class=”attribute-value”>content-type </span><span class=”attribute-name”>content</span>=<span class=”attribute-value”>”text/html; charset=UTF-8″</span>>
|
Riassumendo,
Ha senso parlare di stringhe di byte soltanto se si conosce l’encoding con cui è stata codificata
Minuto 5 – Utilizzare sempre il codec UTF-8
Dagli esempi visti in precedenza emerge che la scelta del codec da utilizzare per i propri dati non è banale, ed è intrinsecamente connessa con la tipologia di caratteri che si andrà a gestire. Se ci si limita ai soli caratteri dell’alfabeto latino, la classica codifica ISO-8859-1, nota anche come latin1, o la cp1252 di Windows (quella di default per le localizzazioni di Windows per i paesi ‘occidentali’) è più che sufficiente. Tuttavia, questi encoding non sono in grado di codificare caratteri non latini (si provi per esercizio a codificare in ISO8859-1 il carattere Unicode U+03A9 che corrisponde alla lettera greca ‘Ω’), e soprattutto nel caso di applicazioni web potrebbero essere la scelta meno adatta. Per questo motivo, oggi UTF-8 è l’encoding diventato standard nel mondo Web, ed è consigliabile sviluppare le proprie applicazioni per gestire stringhe di byte codificate con questo codec.
Riassumendo,
Utilizzare UTF-8 come encoding standard per la codifica di stringhe Unicode
Come visto, occorrono pochi minuti per apprendere le basi di Unicode. I concetti di base sono quelli. Bisognerebbe poi accennare al fatto che Unicode nasce per essere retrocompatibile con ASCII 7bit (i primi caratteri sono proprio quelli dell’ASCII), così come molti codec hanno come sottoinsieme i codepage più diffusi dell’ASCII esteso. Ma questi sono dettagli che oggi si possono ignorare senza problemi.
Successivamente alla pubblicazione di questo articolo, è nata una discussione sul forum programmazione di Ubuntu-it in cui mi hanno fatto notare che la rappresentazione interna di stringe in Java è UTF-16, come riportato qui. Tuttavia, ciò non toglie che è importante sapere sempre qual è la codifica dei propri dati in ingresso, e non affidarsi ai default encoding della particolare piattaforma.
Per concludere, qualche riferimento per approfondire. Il riferimento più citato della rete è senza ombra di dubbio:
http://www.joelonsoftware.com/articles/Unicode.html
Ai pythonisti consiglio vivamente la lettura di questo tutorial che io reputo il migliore:
http://boodebr.org/main/python/all-about-python-and-unicode
Se avete ereditato dei dati di cui non sapete nulla circa l’encoding adoperato, vi consiglio di dare uno sguardo al modulo chardet:
http://chardet.feedparser.org/
Infine, Wikipedia è un ottimo punto di partenza per le varie specifiche:
http://en.wikipedia.org/wiki/Unicode
http://en.wikipedia.org/wiki/UTF-8
http://en.wikipedia.org/wiki/ISO_8859-1
http://unicode.org/
Vi sarò grato se lascerete eventuali commenti e considerazioni. O magari mi direte se questo breve tutorial è stato utile o no.
Come dite?!?!? Non ho detto tutto??!? Ah già  Non ho detto cosa significa l’ideogramma 简, che si legge ‘jiǎn’. Ebbene significa ‘semplice’ (come Unicode, no?!?!), ma anche ‘semplificare’; il suo codice Unicode è U+7B80 e la rappresentazione in UTF-8 è ‘\xe7\xae\x80‘, quindi 3 byte.
Fonte: www.carminenoviello.com
Web Scraping with Python
After you’re done reading, check out my follow-up to this post here.
Yea, yea, I know I said I was going to write more on pandas, but recently I’ve had a couple friends ask me if I could teach them how to scrape data. While they said they were able to find a ton of resources online, all assumed some level of knowledge already. Here’s my attempt at assuming a very minimal knowledge of programming.
Getting Setup
We’re going to be using Python 2.7, BeautifulSoup, and lxml. If you don’t already have Python 2.7, you’ll want to download the proper version for your OS here.
To check if you have Python 2.7 on OSX, open up Terminal and type python –version. You should see something like this:

Next, you’ll need to install BeautifulSoup. If you’re on OSX, you’ll already have setuptools installed. Let’s use it to install pip and use that for package management instead.
In Terminal, run sudo easy_install pip. You’ll be prompted for your password – type it in and let it run. Once that’s done, again in Terminal, sudo pip install BeautifulSoup4. Finally, you’ll need to install lxml.
A few scraping rules
Now that we have the packages we need, we can start scraping. But first, a couple of rules.
- You should check a site’s terms and conditions before you scrape them. It’s their data and they likely have some rules to govern it.
- Be nice – A computer will send web requests much quicker than a user can. Make sure you space out your requests a bit so that you don’t hammer the site’s server.
- Scrapers break – Sites change their layout all the time. If that happens, be prepared to rewrite your code.
- Web pages are inconsistent – There’s sometimes some manual clean up that has to happen even after you’ve gotten your data.
Finding your data
For this example, we’re going to use the Chicago Reader’s Best of 2011 list. Why? Because I think it’s a great example of terrible data presentation on the web. Go ahead and browse it for a bit.
All you want to see is a list of the category, winner, and maybe the runners-up, right? But you have to continuously click link upon link, slowly navigating your way through the list.
Hopefully in your clicking you noticed the important thing though – all the pages are structured the same.
Planning your code
In looking at the Food and Drink section of the Best of 2011 list, we see that all the categories are a link. Each of those links has the winner, maybe some information about the winner (like an address), and the runners-up. It’s probably a good idea to break these things into separate functions in our code.
To start, we need to take a look at the HTML that displays these categories. If you’re in Chrome or Firefox, highlight “Readers’ Poll Winners”, right-click, and select Inspect Element.
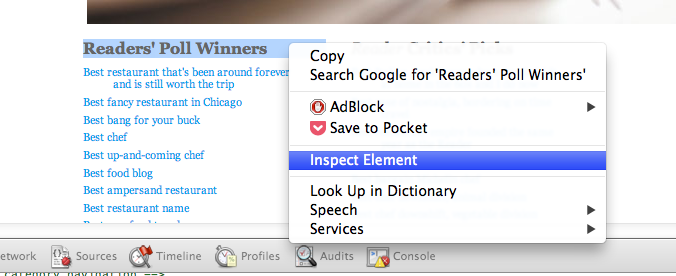
This opens up the browser’s Developer Tools (in Firefox, you might now have to click the HTML button on the right side of the developer pane to fully show it). Now we’ll be able to see the page layout. The browser has brought us directly to the piece of HTML that’s used to display the “Readers’ Poll Winners” <dt> element.
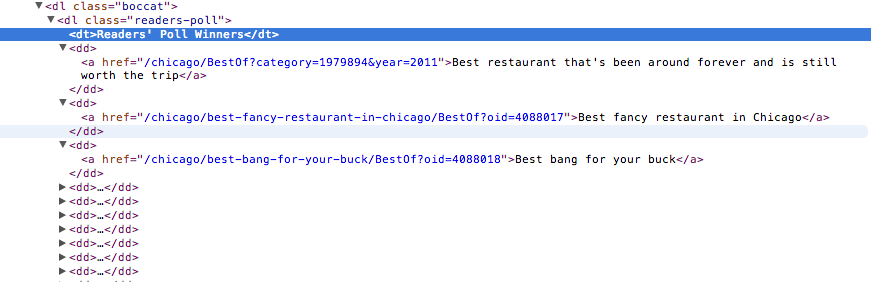
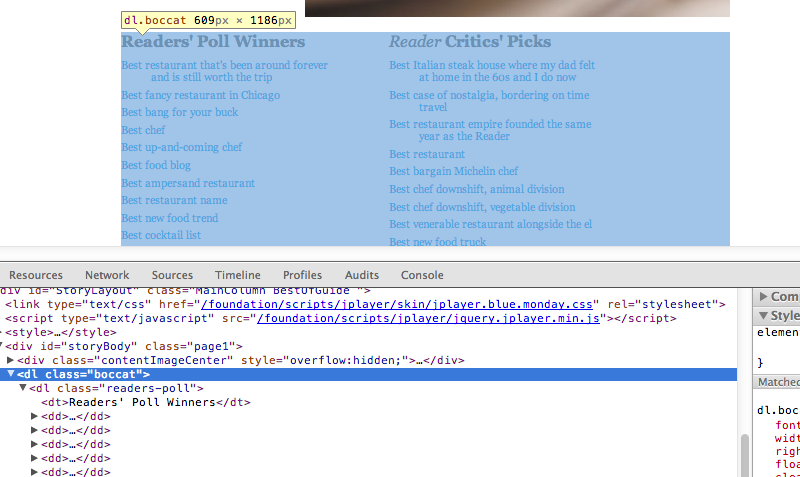
This seems to be the area of code where there’s going to be some consistency in how the category links are displayed. See that <dl> just above our “Readers’ Poll Winners” line? If you mouse over that line in your browser’s dev tools, you’ll notice that it highlights the entire section of category links we want. And every category link is within a <dd> element. Perfect! Let’s get all of them.
Our first function – getting the category links
Now that we know we know the <dl> section holds all the links we want, let’s write some code to find that section, and then grab all of the links within the <dd> elements of that section.
from bs4 import BeautifulSoup
from urllib2 import urlopen

BASE_URL = "http://www.chicagoreader.com"

def get_category_links(section_url):
    html = urlopen(section_url).read()
    soup = BeautifulSoup(html, "lxml")
    boccat = soup.find("dl", "boccat")
    category_links = [BASE_URL + dd.a["href"] for dd in boccat.findAll("dd")]
    return category_links
Hopefully this code is relatively easy to follow, but if not, here’s what we’re doing:
- Loading the urlopen function from the urllib2 library into our local namespace.
- Loading the BeautifulSoup class from the bs4 (BeautifulSoup4) library into our local namespace.
- Setting a variable named BASE_URL to “http://www.chicagoreader.com”. We do this because the links used through the site are relative – meaning they do not include the base domain. In order to store our links properly, we need to concatenate the base domain with each relative link.
- Define a function named get_category_links.
- The function requires a parameter of section_url. In this example, we’re going to use the Food and Drink section of the BOC list, however we could use a different section URL – for instance, the City Life section’s URL. We’re able to create just one generic function because each section page is structured the same.
- Open the section_url and read it in the html object.
- Create an object called soup based on the BeautifulSoup class. The soup object is an instance of the BeautifulSoup class. It is initialized with the html object and parsed with lxml.
- In our BeautifulSoup instance (which we called soup), find the
<dl>element with a class of “boccat” and store that section in a variable called boccat. - This is a list comprehension. For every
<dd>element found within our boccat variable, we’re getting the href of its<a>element (our category links) and concatenating on our BASE_URL to make it a complete link. All of these links are being stored in a list called category_links. You could also write this line with a for loop, but I prefer a list comprehension here because of its simplicity. - Finally, our function returns the category_links list that we created on the previous line.
Our second function – getting the category, winner, and runners-up
Now that we have our list of category links, we’d better start going through them to get our winners and runners-up. Let’s figure out which elements contain the parts we care about.
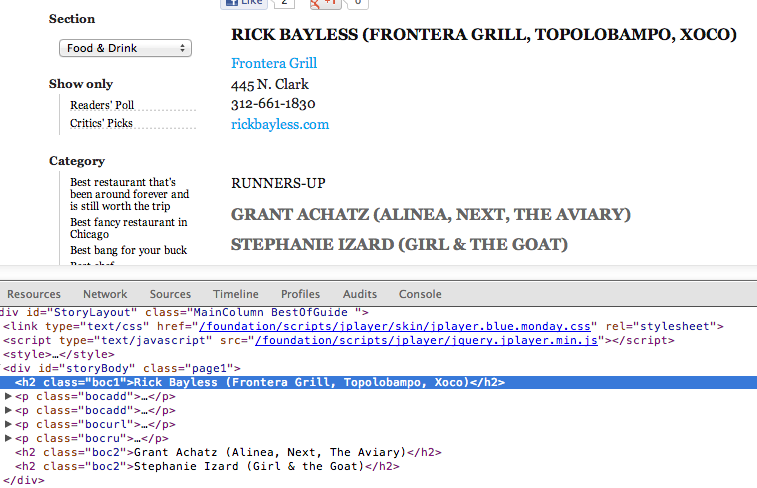
If we look at the Best Chef category, we can see that our category is in <h1>. Shortly after that, we find our winner and runners-up stored in <h2> and <h2>, respectively.
Let’s write some code to get all of them.
def get_category_winner(category_url):
    html = urlopen(category_url).read()
    soup = BeautifulSoup(html, "lxml")
    category = soup.find("h1", "headline").string
    winner = [h2.string for h2 in soup.findAll("h2", "boc1")]
    runners_up = [h2.string for h2 in soup.findAll("h2", "boc2")]
    return {"category": category,
            "category_url": category_url,
            "winner": winner,
            "runners_up": runners_up}
It’s very similar to our last function, but let’s walk through it anyway.
- Define a function called get_category_winner. It requires a category_url.
- Lines two and three are actually exactly the same as before – we’ll come back to this in the next section.
- Find the string within the
<h1>element and store it in a variable named category. - Another list comprehension – store the string within every
<h2>element in a list called winner. But shouldn’t there be only one winner? You’d think that, but some have multiple (e.g. Best Bang for your Buck). - Same as the previous line, but this time we’re getting the runners-up.
- Finally, return a dictionary with our data.
DRY – Don’t Repeat Yourself
As mentioned in the previous section, lines two and three of our second function mirror lines in our first function.
Imagine a scenario where we want to change the parser we’re passing into our BeautifulSoup instance (in this case, lxml). With the way we’ve currently written our code, we’d have to make that change in two places. Now imagine you’ve written many more functions to scrape this data – maybe one to get addresses and another to get paragraphs of text about the winner – you’ve likely repeated those same two lines of code in these functions and you now have to remember to make changes in four different places. That’s not ideal.
A good principle in writing code is DRY – Don’t Repeat Yourself. When you notice that you’ve written the same lines of code a couple times throughout your script, it’s probably a good idea to step back and think if there’s a better way to structure that piece.
In our case, we’re going to write another function to simply process a URL and return a BeautifulSoup instance. We can then call this function in our other functions instead of duplicating our logic.
def make_soup(url):
    html = urlopen(url).read()
    return BeautifulSoup(html, "lxml")
We’ll have to change our other functions a bit now, but it’s pretty minor – we just need to replace our duplicated lines with the following:
soup = make_soup(url) # where url is the url we're passing into the original function
Putting it all together
Now that we have our main functions written, we can write a script to output the data however we’d like. Want to write to a CSV file? Check out Python’s DictWriter class. Storing the data in a database? Check out the sqlite3 or other various database libraries. While both tasks are somewhat outside of my intentions for this post, if there’s interest, let me know in the comments and I’d be happy to write more.
Hopefully you found this post useful. I’ve put a final example script in this gist.
Fonte: gregreda.com
Installing xlrd module in Portable Python
Portable Python is a neat project to put python on a USB stick (or wherever) to not have to install it on your machine. xlrd is an excellent Python module for reading Excel files.
To make the
1. Install Portable Python to a location of your choice. http://www.portablepython.com/
2. Download
3. Extract the
4. Copy the files found in
I suggest you create a directory for the files (e.g. Portable Python 2.7.3.1\App\Lib\xlrd).
5. Start using
xlrd module available in your Portable Python installation (so you can use it in a script using import xlrd) you just have to copy the source files:1. Install Portable Python to a location of your choice. http://www.portablepython.com/
2. Download
xlrd http://pypi.python.org/pypi/xlrd3. Extract the
xlrd tar.gz file4. Copy the files found in
xlrd folder (e.g.xlrd-0.8.0.tar.gz\dist\xlrd-0.8.0.tar\xlrd-0.8.0\xlrd\) to the App\lib directory of the Portable Python installation.I suggest you create a directory for the files (e.g. Portable Python 2.7.3.1\App\Lib\xlrd).
5. Start using
xlrd in scripts run using Portable Python